Integrating MailChimp & Squarespace
I used to use MailChimp as my email marketing service and e-course delivery service. It wonderfully integrates with Squarespace. (Another reason to love Squarespace). I still use it for another site I blog at since that one is more of hobby. It's great for those still in the startup phase and who are still bootstrappin'.
But now I use CONVERT KIT. More on why here.
Squarespace offers three integrations with MailChimp through the Form Block, Newsletter Block, and the Checkout Page. You can also use MailChimp's RSS to Email campaign feature to allow your audience to receive your latest blog post in their inbox as soon as you’ve posted it.
(If you love crafting beautiful and high value blog posts and getting them into your subscribers inboxes asap like me, then this is a great way to outsource your work and create an automated system as a solopreneur on a shoestring budget.
Additionally, using MailChimp with Squarespace is great way to connect with your visitors beyond your site and is the primary way I choose to market my offers. The way I do that, and also encourage my e-course students to do that, is by using Mailchimp to create a free e-course and then create a premium e-course.
The main strategy is to get your audience to sign up for your free course to show them what you can do in a premium course. The way to get them into your free course is by providing OPT-INs strategically on your website. You do that with Mailchimps integrations which then allow your free course to automatically be sent to your subscriber.
(More systems, which save you time and make you money! Yes!)
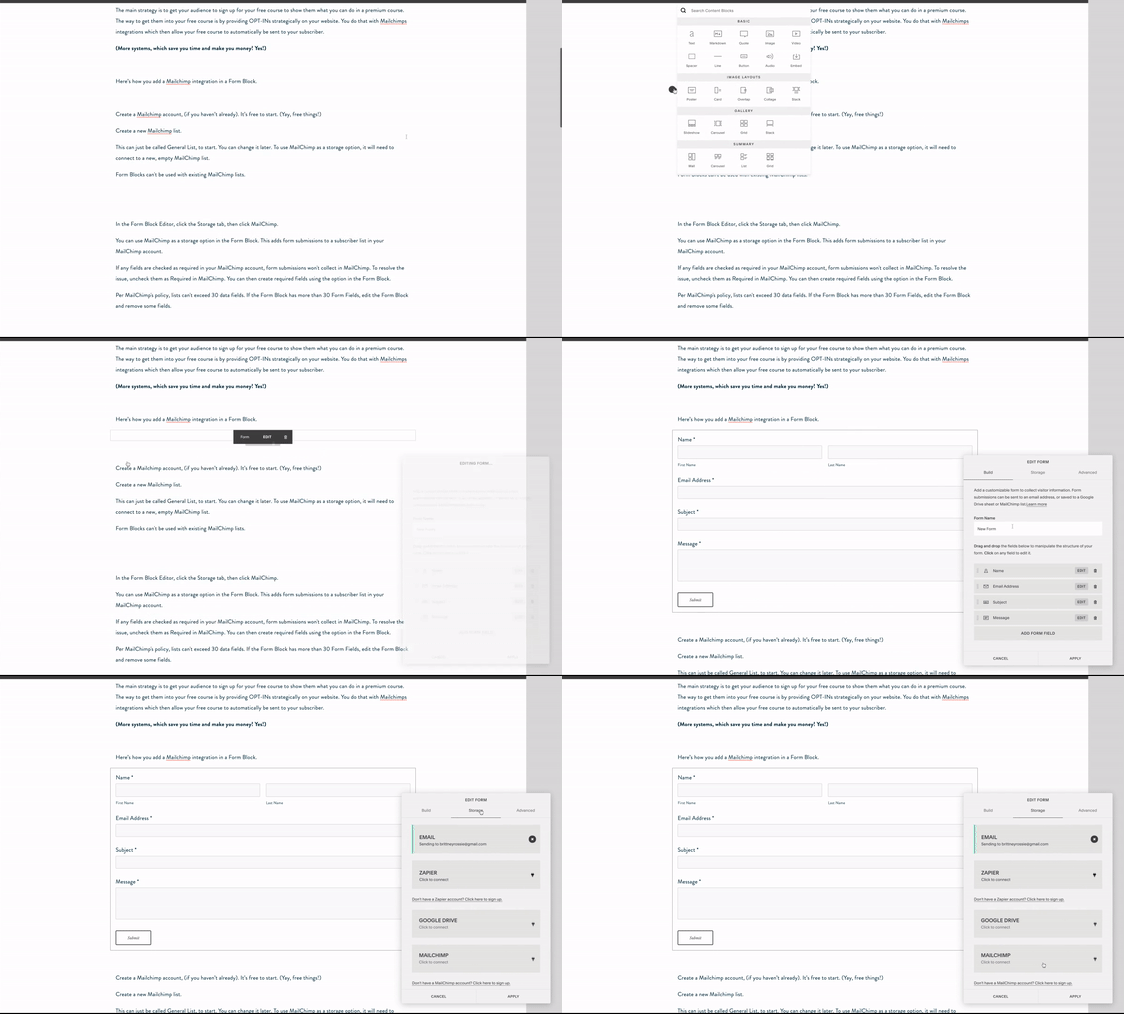
Here’s how you add a Mailchimp integration in a Form Block.
1. Create a Mailchimp account, (if you haven’t already). It’s free to start and you simply follow the prompts. (Yay, free things!)
2. Create a new Mailchimp list.
This can just be called General List, to start. You can change it later. To use MailChimp as a storage option, it will need to connect to a new, empty MailChimp list.
3. Select the Form Block Editor, click the Storage tab, then click MailChimp.
Choose a List (probably that General List you just created) so that it adds form submissions to the right list in your MailChimp account.
4. Click Save and Tadaa!
You can also connect a Newsletter Block to your MailChimp account. The process is very similar.
1) Select the Newsletter Block, Add your title and subscription.
2) In the Disclaimer box, add optional information about what you do with subscriber information.
No, seriously, use this field for your privacy policy. It's super important.
3) Select Storage, Mailchimp and then choose a list. It's just like with the Form Block.
4) Customize submission messages. Make it urgent or fun!
5) Click the Advanced tab to add more customization to the block.
6) The Submit Button Label controls the button visitors click to submit their form. The default text is Sign Up. To change it, replace the text.
7) The Post-Submit Message appears after a visitor submits a form. You can personalize this text and style it with the text toolbar.
8) In the Post-Submit HTML box, you can add code to display along with the Post-Submit message.
9) Click save!
You can style the Newsletter block by going to the style editor in the Design the menu.
Do you prefer to use the Squarespace integration or the Mailchimp form HTML? Is there anything else you'd like to learn about Squarespace and Mailchimp together?
Psssst! Do you love how easy Squarespace is?
Maximizing Squarespace SEO is JUST as easy and JUST as important as growing your list!
I cover all the bases and show you insider tips to make your site SUPER searchable for search engine optimization (SEO).
Grab the workbook here to make sure your site is optimized!
