How to Use Honeybook Automations

If you’re a creative entrepreneur who wants a fast and easy online way to send invoices and proposals, collect credit card payments and sign digital contracts, stay right where you are and keep reading.
In this post, I’m going to show you exactly how I use HoneyBook for my business, take you behind-the-scenes so you can see the back end of this super simple software and give you a step-by-step tutorial of what I do every time I book a client.
I’ve been in online business for 3 years now and if you’re like I was a couple of years ago –– wasting hours of time fiddling with 3 different free softwares to save a buck –– then hear me on this one: your life is too short!
With HoneyBook, I can do all of that digitally in ten minutes or less.
The time savings (alone) is worth a few dollars per client.
If that’s you, no worries. I’ve got good news! I’ve partnered with the amazing people at HoneyBook to get you 50% off your first year with them. That’ll save you $20/month if you pay monthly or $200/year if you go with an annual subscription. Do not waste time like I did. Snag the link now. You’ll thank yourself later.
Before we get started, make sure to check out this other blog post where I explain the 4 Essential Things I Do When I Book A Client.
Pssst…Want to know the other essential tools and systems I use to run my business?
Get them here along with discount Codes to help you get started!

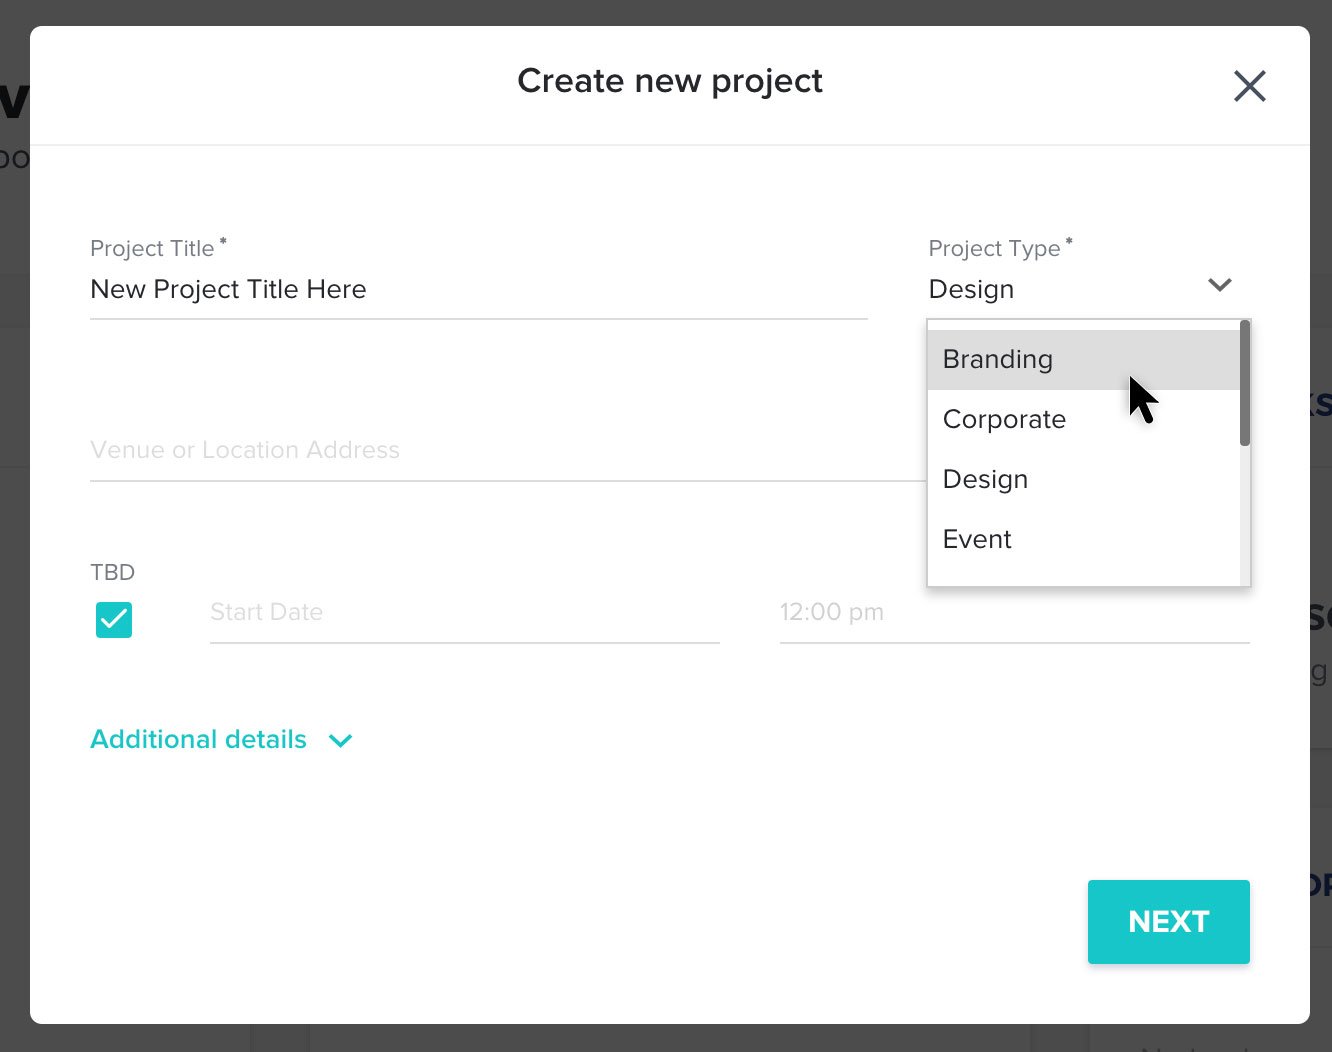
Step 1: Add New Project
Click “New” to add a new project to your workflow.
You’ll see some required fields, like “Project Title” and “Type,” as well as some optional fields. I fill in as much information as I have at the time. You can always add more later.

Next, it’s time to add participants.
On the left side underneath the the client’s name, date and venue, you’ll see an option to “Add Participants.” We always add the client and other decision makers (if applicable). Adding a participant doesn’t allow them to see the back end of HoneyBook or let them make changes to documents (like contracts) –– so you don’t have to worry about that. It just lets the system know who to share files with as you complete them. So, when you finish the proposal, you don’t have to manually enter the client’s email address, and then enter it again when you’re ready to send another document. Also, sometimes the client wants their virtual assistant to have copies of everything, too. So, by adding them all once (at the beginning) you save some time down the road.

Now, you’re ready to create a proposal.
Click “New File” in the lower right corner underneath “Project Details” and select “Proposal.” The first few times I did this, my brain wanted to click “Invoice” since I was so used to sending invoices and contracts separately, but make sure to choose “Proposal” because that will allow you to send an invoice and contract in one neat digital package for your client.

Click “New File” in the lower right corner underneath “Project Details” and select “Proposal.”

Click “Blank Proposal.”
First, click “Blank Proposal.” Then, click “Add Package or Item.”
For me, a menu of options appears because I’ve added the packages I sell frequently. If it’s your first time using HoneyBook, you’ll only see “Custom Item.” Go ahead and select “Custom Item,” and it’ll prompt you to create a brand new invoice. When you’re done, save the invoice as a template, and the next time you build a proposal for a client, you’ll see your template in the list of options like I do.


Once a package is created or selected, HoneyBook automatically creates the entire invoice.
For a cleaner, prettier version of the invoice that doesn’t show all the line items, just click “Show Less” and it will collapse all the extras and just show the package and price. Your client has the option to “Show More” if they want to see all the detail.
If you’re required to charge sales tax in your state, there’s a line to add sales tax to the subtotal. If you’re allowed to separate goods and services in your state for sales tax purposes, you can create one package for goods and another package for services. Then, just click the word “Tax” next to the package you want HoneyBook to apply sales tax to and uncheck the one you don’t.
Step 2: Payment Schedule
Once the proposal is completed, HoneyBook will automatically create a payment schedule for you where you can select the number of payments the client will make, the amounts and the due dates. From there, HoneyBook will “gently remind” your clients when payments are due, and keep you posted if a payment is missed. You just set it and forget it.
It’s my favorite feature.

Step 3: Fill Out Contract
If your clients sign contracts, before you create your first proposal, you’ll want to add your contract(s) to your “Templates.” Once your contracts are uploaded, when you’re creating a proposal, all you’ll have to do is click “Agreement Templates” in the upper right corner, and you’ll be able to select the contract template you want to use for that client. Even better, the contract will take the information from the proposal and your client’s participant profile, and auto-populate it with the actual date, event date, venue/location, client’s name, contract amount and more.
If you get stuck, HoneyBook has a free Help Center that’s really detailed and will walk you through exactly how to do this.

Step 4: Send Proposal to Client
Now, you’re ready to send the proposal to your client.
Just click “Next: Review Email” and you’ll have the option to select the template email you want to send your client and groom.
When you select the template you want, it’ll auto-populate the text in the email field.
Click “Send” in the lower right corner and HoneyBook will send the entire proposal to all the participants for the wedding.
If, for some reason, you need to make a change to any part of the proposal, just click “Edit” and hit “Resend Proposal” when you’re done.
If you ever need to add new files to the project for everyone to see, like a timeline or an additional invoice, just click “New File” on the right side and HoneyBook will send the file to all of the participants when you’re finished.


All done!
Now that you have templates, things will move forward EVEN faster if you create preset packages and payment plans. Honeybook is a lifesaver.
If you’re ready to streamline your systems for the first time, I’ve got a deal with the good folks at Honeybook so that you can get 50% off right here!
